Saturday, August 17, 2013

Yoghurt making

Want to know how to make gorgeous thick, scrummy, yoghurt cheaply and without a machine?


I have been making yoghurt for around four years on and off. I had a batch going in New Mexico that lasted for over two years without ever having to buy a new starter culture.
I don't use a machine and I didn't used to use a thermometer but after having a failed batch in this country I checked other recipes on line to find the common method of making yoghurt.
 
Ingredients: 2pints of full-fat milk
                   4Tblspn live yoghurt
                             3Tblspn dried milk powder
 
 
So to make 2 pints of yoghurt: bring 2 pints of full fat milk with 3tablespoons of dried milk powder whisked in gently up to the boil. You just want to get it to the point where the bubbles are forming on the edge of the pan. Don't burn burn the milk on the bottom of the pan!. If you have a sugar or jam making thermometer it should read 82c/180f. Take off the heat and let the milk cool in a glass bowl or large jar. Cover the bowl to stop milk forming a skin. when the milk has cooled down to about 43c/105f. or where it feels warm to the skin but not hot stir in 4 tablespoons or 75g of yoghurt. This has to be a yoghurt that states it has live culture in it, or it won't work. I used Sainsbury's Greek style natural yoghurt. Re-cover your bowl or jar and place in a large pan with enough warm water to reach up the sides of your bowl. Grab a couple of towels and wrap the pan up to keep your yoghurt warm. The yoghurt should set within 8 hours depending on the temperature in your house. Some people put the yoghurt in a wide mouthed thermos to keep it at  warm temperature, might do this in the winter. Check every few hours to see if the water is still warm, mine stayed warm so  I didn't have to refill the pan.
This is the size pan I used but put it on the work surface with a towel under it and put another towel over the top.
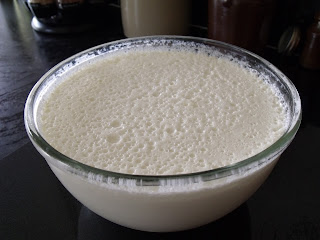
This yoghurt has set really well and it has a pattern of bubbles on top!
Just showing off now.
What better way to serve yoghurt than with some stewed cherries that were picked fresh off the tree for free.
 
 
Don't forget to save some of the yoghurt to start a new batch. You can  freeze the yoghurt in an ice cube tray and save in a bag or container so you always have a starter culture when you need it.
 
Here are my calculations for the cost of making yoghurt.
Milk if bought from Asda 4pints for 1 pound = 50p for 2 pints
Sainsbury's Greek natural style yoghurt 200g pot for 55p so 75g needed  = 21p
Asda dried skimmed milk powder 340g for 1.88 so 20g needed = 11p
grand total of . . . 82p for 2 pints but next time it's cheaper as you will have the starter yoghurt so it will only cost 61p.
 
You don't have to use dried milk in a recipe, as I never have before but it did make it a bit thicker and smoother textured. I might try with just 2 Tbsps. next time to see how that works out.
I find it keep in the fridge for up to 10 days.
 
Note for American readers: An English pint is 20 fl.oz


Friday, August 9, 2013

Chester day trip

On Sunday I took a day trip to Chester. The coach picks up at the bottom of the street at 8:30am so not an uncivilized hour for someone like me. I have to confess to not being a morning person!
We arrived in Chester and dropped most of the passengers off at the famous zoo, there were only five of us for the city center.

This was the fist sight that greeted us, an original old bus complete with a conductress in historical costume. You could pay to go round on a tour of the city, would have been fun but costly.
This is Chester cathedral, the photo is a bit dark sorry!


Everywhere you turned historic buildings met the eye. There are an amazing amount of shops in Chester and most are housed in very old buildings.
We decided to go for a walk along the city wall. Quite a long walk as it goes completely around the city, but I would really recommend it as you get a great view of everything. It rained on and off most of the day but it was still really enjoyable

 
These are the remains of a Roman bath house, luckily there were steps down from the wall so we could get off and explore a bit more.


Have to take photos of plants I would like to grow.

Back on the wall

We crossed the back of the cathedral, love the formal gardens.


This scene just looked so 'English' with the old houses and the green with an old roller . I wonder if they use the green to play cricket on or maybe croquet

This is me being a bit of a voyeur I spotted this lovely little garden sandwiched between
 the wall on one side and the river on the other. I think it is quite a magical place, I have extreme garden envy.

The rain started coming down in buckets so we ended up wandering round the shops but just look at the interior of this shopping mall.

 
Better get on and do some craft work, I will share that with you next time.
Bye for now
Jane

Friday, August 2, 2013

Day tripping

Everyone seems to talking about 'staycations'  in other words staying at home and having your vacation there. Taking a trip out in the car can be expensive what with the price of petrol and then huge parking fees when you get there.  Also it's not much fun for the driver trying to get to some local beauty spot in the height of summer when there seems to be everybody and his dog on the road.
I have made the choice not to get another car so driving isn't an option, but there are some good alternatives so you can have a reasonably cheap day out without the stress. You can get train tickets at reduced rates if you book far enough in advance. I use a local coach company that offer reasonably priced day trips. The prices range from ten pounds upwards, it's a comfortable way to travel and often you can be picked up and dropped off close to your home.

On  Saturday I went to Durham at a cost of 14.00 pounds. Set off at 8:30 got there at 11:30 and left Durham at 5pm. I think it a was a journey of 150 miles and I had a lovely day out and got to see a different part of the country.


Durham is quite a compact city full of history. In the distance you can see both the cathedral and the castle on the hill.


Views of the cathedral. The interior was just incredible but photos weren't allowed!


Too bad the castle and grounds were closed for the day


The beauty is in the details


Lots of lovely streets to explore


Lively folk dancers entertaining the crowds


A short bus ride away are the botanical gardens where you can relax away from the busy streets.
 
 
We had a great day out at a reasonable price, and helped the enviroment too by keeping an extra car off the road . . . yes I know I said I didn't have one! We saved extra money by packing food and drinks for lunch.                                                                                                                            
 
This Sunday we will be going to Chester on another day trip.
Bye for now
Jane


Saturday, July 20, 2013

How to make a lavender wand

I thought I would have a go at making a lavender favor today, something I haven't tried in over thirty years! The sun is blazing down but I am braving the heat in order to take the photos. I must be crazy but I need to work with the lavender while the stems are still pliable. I picked a lovely bunch last week but left them too long and they became dry and brittle. So always work with freshly picked lavender.


Wrap the stems in a damp paper towel so they don't dry out too quickly. You will need at least 15 stems but you can use as many as you like as long as they are an odd number. Get some narrow  ribbon of your choice (5mm), a pair of scissors and a blunt darning needle or toothpick.


Cut off about 56" (142cm) of ribbon and tie the lavender together leaving a long tail and a shorter one of about14"  (36cm).  You are going to work with the long tail and leave the shorter one laying along the stems


Now the fun part!  Bend all the stems back on themselves so that they are facing in the opposite direction and laying over the flowers. They should look like umbrella spokes circling the flowers . At this point you could pull off the leafy bits that are still attached to the stems,or if you are lazy like me leave them as they are going to get trimmed off anyway,


Taking the long tail of ribbon start to weave in and out, over & under, round & round. You will be working in a spiral gradually working down the stems. It is a bit fiddly to begin with, I find it easier to lift the stems and ease the ribbon under them. I did try threading the needle and using that to weave the ribbon in and out but I ended up with the ribbon all tangled up. Use the needle or toothpick to ease the ribbon into place once you have woven it. You can also adjust the tension, but don't go for perfection, that way madness lies!


When you get to the point underneath the flowers you could either tie the two ends of ribbon in a bow and trim off the stems or . . . .
 
leave the short tail  of ribbon laying alongside the stems and wrap around with the  long tail. I tied the two ends of ribbon in a tight knot, trimmed the stems and then tied a knot at the ends of the ribbon to form a hanging loop. You can hang this in a wardrobe or closest or place in a drawer.

 
Not only pretty but useful too as lavender is a good deterrent of moths. Next job is to run up some lavender sachets so I can use up the lavender I picked last week.
 
Have fun, bye for now
Jane

Monday, July 8, 2013

A wonderful gift

I had been promised this lovely object for quite a while. It has been lurking up in the loft space. It belonged to my uncles mother and has been lovingly used over the years. My Aunty knows how much I love to sew and craft, and also how much I appreciate old/vintage things. I have never seen this particular machine before but I immediately fell in love.


I think it was the designs on the machine that immediately struck a cord.


Sorry the colours are a bit washed out, the light was bright for once, we has sun! also I gave it a nice polish and the light is reflecting off.  Love the green, orange, and gold combination.

 
The machine was made in 1920, it has a little wear and tear but I still works. These sewing machines are real work horses and are classed as industrial as they will sew through very thick layers of material including denim and even leather.

 
I am so glad it came with a manual, also has lots of weird and wonderful attachments. The leaflet on the right shows you how you can make a rug using a special tool.


I know we are going to have such fun together . . . .oh happy days!

Bye for now
Jane